Why a Print Farm for Orthodontics?
Developing a multi-printer lab facility allows you to scale the manufacture of 3D printed models and appliances. As volume grows, a 3D print farm maximizes the print area, workflow and overcomes the barriers to production in-house. Instead of investing in a single, large and expensive 3D printer, one can buy multiple, smaller and less expensive printers that run in batches.
When you have a single 3D printer, even if it very fast, you will run into challenges in maximizing the print area and waiting for a batch to finish before another can begin. Consider each 3D printer has a build area. For example, if the build area is 5” x 5” in your printer, adding a second printer increases your print area to 10”x10”. Add another, and you have 15”x15”. Continue to expand, and your volume can increase.
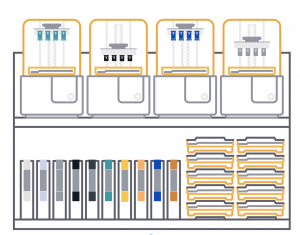
The multiple print areas also allow for the use of different resins when different parts need to be made. For example, 3D printing study models and printing intraoral appliances require different resins. A large single printer could handle the volume of both parts together, but cannot handle the different materials at the same time. When you have different printers you can handle the batches without the lab having to change the resin and run the printer again.
Another advantage of a print farm is safety in numbers. What if your 3D printer goes down? Having multiple 3D printers in your lab gives added safety that you won’t have to outsource your printing while your only printer is getting repaired.
How to Plan and Implement
It first begins with selection of your 3D printers. It is often easier to setup a multiple printer facility having the same printers multiplied. This allows for ease of training and use by your lab team, and a simplified process to manufacturing. Diversifying your farm with multiple types of printers could allow for different speeds of prints and different workflow depending on the urgency of the desired batch.
When planning a print farm, select a work area with adequate space, ventilation, and proper lighting. Avoid direct sunlight, UV light, dust and high traffic areas since they can affect the printing process. The printers should be in a stable, flat surface free of debris. They also need shelving that allows for the lids to open.
Multiple printers need to be labeled to prepare the print queue. Large batches of prints can get more difficult to track and retrace. If there is defective print, proper labeling allows the lab tech to trace the affected printer. Tanks and platforms should also be labeled if different types of resins are being used.
For more details, see the Formlabs whitepaper
Layout and key components
- Download – An stl file is downloaded after the patient is scanned
- Preparation – The lab computer station cleans up the model and prepares the print layout in the 3D printer software
- 3D printers – Printers are conneted via Ethernet, USB or WiFi
- Washing area – Isopropyl alcohol tanks are used to wash the prints. This needs consideration for proper ventilation.
- Drying area – A ventilated area is used where a tray of prints are placed under a fan.
- Post-curing (if needed) – With some resins, an additional post-cure step is required using UV light.
- Finishing – remove supports, polishing and trimming
- Packaging area – prepare models for appliance fabrication or package appliance for delivery


great idea. you are one smart person.