Attachment Selection and Design
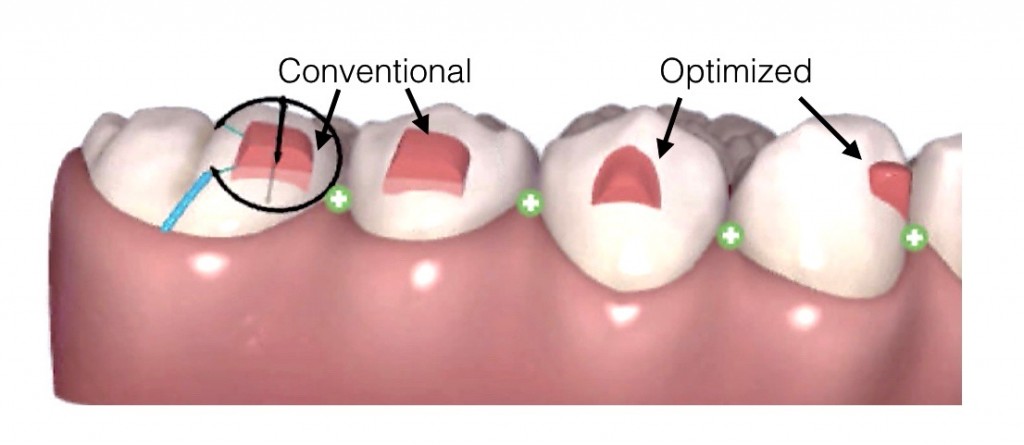
Attachments serve several purposes in aligner therapy. The most basic function is retention. In order to fully express prescribed movements, the aligners have to be fully seated. Aligners have a flexibility that needs to be compensated when seated onto arches that require movement. The second function of attachments is to facilitate movement by changing the shape of the tooth to provide an active surface for pushing.
The active surface of the optimized attachment is oriented to deliver the desired forces while simultaneously extruding, rotating or providing root control. Each attachment has a specific surface where the aligner provides that pressure, while the non-active surface is relieved to avoid any interference.
When it comes to Invisalign treatment, the use of attachments is an important step to achieving the best results. But what attachment is the most effective for the desired movement? That answer depends on the desired function of the attachment, and the type of movement planned.
For retention, conventional attachments are very effective. Greater retention can be achieved by increasing the size of the attachment from 3 mm to 4 mm or 5 mm width. Retention provides anchorage and also locks the aligner better when using inter-arch elastics.
For active movements, optimized attachments have been designed by data-driven analysis. These attachments are customized by Align Technology’s software to deliver specific force systems. They are added when the intended movement meets a certain threshold. When these attachments match the desired force system, they are the recommended selection when you are considering traditional attachments vs. aligner optimization. Some movements do not meet the criteria to generate an optimized design. This is where modifications to conventional attachments can be made to approximate the designs of optimized attachments normally selected for the desired movements. Using 3D controls, the position and amount of bevel can be adjusted to match a similar, optimized design.

This is great, when I am teaching grad students, they do not always comprehend the design of the attachments. As well this is fabulous to teach staff members as well. Can I use this in teaching at the University of Alberta Faculty of Medicine and Dentistry Grad Ortho Program?
TDC
Thanks Terry,
You’re welcome to reference and share the site with the residents. We would also love if they joined to gain access to the information directly. There is more to come.
Aloha,
Sean
1. What are your thoughts on precision cuts vs button cutouts for elastic wear?
2. If you use precision cuts, do you put an attachment on the tooth with the cutout or the adjacent tooth?
It depends on the case but generally Precision Cuts > Button Cutouts
If an attachment is needed to support the tooth movement, place the attachment on the tooth with the precision cuts, if not already triggered. Otherwise, there simply needs to be enough retention to hold the elastics so an attachment on an adjacent tooth can be fine. If there is less retention that expected (extremely rare), just cut out the aligner and place a button.
To add, Joel, I prefer whenever possible to do precision cuts instead of buttons in order to avoid potential emergency appt due to debonded button. That being said, the instances where I bond a button are usually due to short clinical crowns. If there is enough surface area for both an attachment and a cut, that is preferred. When running Class II elastics, the lower arch needs significant retention, so the bicuspids and first molars should have enough retention.